W3C Webdriver conquering automation of Shadow DOM {Chapter 2}
Before taking a step ahead, let’s have a glimpse of the internal workings of W3C Webdriver with Shadow DOM.
Peek at Internal workings of W3C Webdriver with Shadow DOM
V3.8 onwards, W3C WebDriver Protocol replaces the older JSON Wire protocol. So it’s very clear that you no longer need to encode/decode the API requests using the W3C Webdriver protocol, and the automated scripts can directly communicate with the web browser drivers.
Though we have enhanced our learning curve by going through the first chapter of this blog series. But still, we are very curious about the unanswered questions from chapter 1. Let’s pick all of the open questions individually that we left at the end of our First Chapter of this Shadow DOM series. I hope you will thoroughly enjoy it.
Is it possible to interact with independent custom elements WITHOUT appending Shadow DOM?
Being Test Engineers, we always attempt following legacy selectors to find the elements:
- CSS & XPath
- document.querySelector method
Let’s see if it works when Shadow DOM is NOT appended with custom elements:
// Custom Element WITHOUT Shadow DOM Code Snippet
<script>
  class MyCustomElement extends HTMLElement {
  connectedCallback() {
    const button = document.createElement(“button”);
    button.onclick = () => alert(“Button is clicked”);
    button.innerText = “Button inside the Custom Element”;
    this.append(button);
  }
}
  customElements.define(“my-custom-element”, MyCustomElement);
</script>

<div><my-custom-element></my-custom-element></div>
Undoubtedly, not appended Custom elements are always accessible through the console after using all the above legacy findElement methods individually.
Is it possible to interact with custom elements WITH appending Shadow DOM?
In chapter one, we have learned that shadowRoot interface is the only entry point to reach out to Shadow DOM elements i.e. by using shadowRoot.querySelector method. So it’s time to append Shadow DOM with custom elements and try the following find element techniques:
- Legacy selectors {CSS & XPath}
- document.querySelector method
- shadowRoot.querySelector method
We are keeping Shadow DOM mode as OPEN.
// Append ShadowDOM with Custom Element Code Snippet
<script>
  class MyCustomElement extends HTMLElement {
  connectedCallback() {
    const shadow = this.attachShadow({ mode: “open” });
    const button = document.createElement(“button”);
    button.onclick = () => alert(“Button is clicked”);
    button.innerText = “Button inside the Custom Element”;
    shadow.append(button);
  }
}
  customElements.define(“my-custom-element”, MyCustomElement);
</script>
<div><my-custom-element></my-custom-element></div>
Results as expected!! Except for the shadowRoot interface, not a single approach is result-oriented. This is the reason we call the shadowRoot interface as an entry point to the Shadow DOM tree.
Now, We are keeping Shadow DOM mode as CLOSED.
// Append ShadowDOM with Custom Element Code Snippet
<script>
  class MyCustomElement extends HTMLElement {
  connectedCallback() {
    const shadow = this.attachShadow({ mode: “closed” });
    const button = document.createElement(“button”);
    button.onclick = () => alert(“Button is clicked”);
    button.innerText = “Button inside the Custom Element”;
    shadow.append(button);
  }
}
  customElements.define(“my-custom-element”, MyCustomElement);
</script>
<div><my-custom-element></my-custom-element></div>
Oops! Everything failed including the shadowRoot interface. So no approach is result-oriented whenever we keep the mode as CLOSED.
Can we handle User-Agent Shadow DOM in automation?
You cannot access a Shadow DOM created by the browser to display control, which is called a #shadow-root (user-agent) in the Dev-Tools. You can only access open custom Shadow DOM (the ones that you create yourself), with the { mode: ‘OPEN’ } option.
Role of Open/Closed mode of Shadow Root?
The Shadow Root leverages two modes –
- OPEN
- CLOSED
The Open mode allows the shadow root to be accessible through JavaScript outside the shadow root but the Closed mode does not. As we have seen above, shadowRoot interface is the only entry point to the Shadow DOM tree when the mode is OPEN. In the case of CLOSED mode, we can not access any Shadow DOM tree elements. It’s so much clear that we can not automate CLOSED mode Shadow DOM tree elements.
What if a Test Engineer wants to automate CLOSED mode Shadow DOM?
To automate the business-critical CLOSED mode Shadow DOM test scenarios, we can ask our developers as well as stakeholders to keep the mode OPEN on the lower environment i.e. test or stage sandbox. Developers still can keep the mode as CLOSED in the production environment.
📍📍For Test Engineers, the Developers can make OPEN/CLOSED mode configurable through the server or CI/CD pipeline.
Can we use legacy selectors {Xpath, CSS} to find Shadow DOM elements?
Above we have tried and it’s very clear, legacy selectors including document interface do not work with Shadow DOM elements.
Is there any good plug-in to find Shadow DOM elements on dev-tools?
I think SelectorsHub playing the role of salt, which we require for all types of test automation recipes. Being a chef, we can not prepare any veg or non-veg dishes without using salt. In the same way, the selectorshub is our main ingredient for our test automation, which helps us to find any type of element inside light DOM or Shadow DOM.
Is there a way to interact with multi-level Shadow Root elements?
The source code is already placed on my GitHub repo that has the implementation of multi-level Shadow DOM tree elements. So get that source code and get your hands dirty on your machine. Whenever you run the code locally {localhost:3000}, it will open up a web application on the browser and then you can see a multi-level Shadow DOM tree through the browser console.
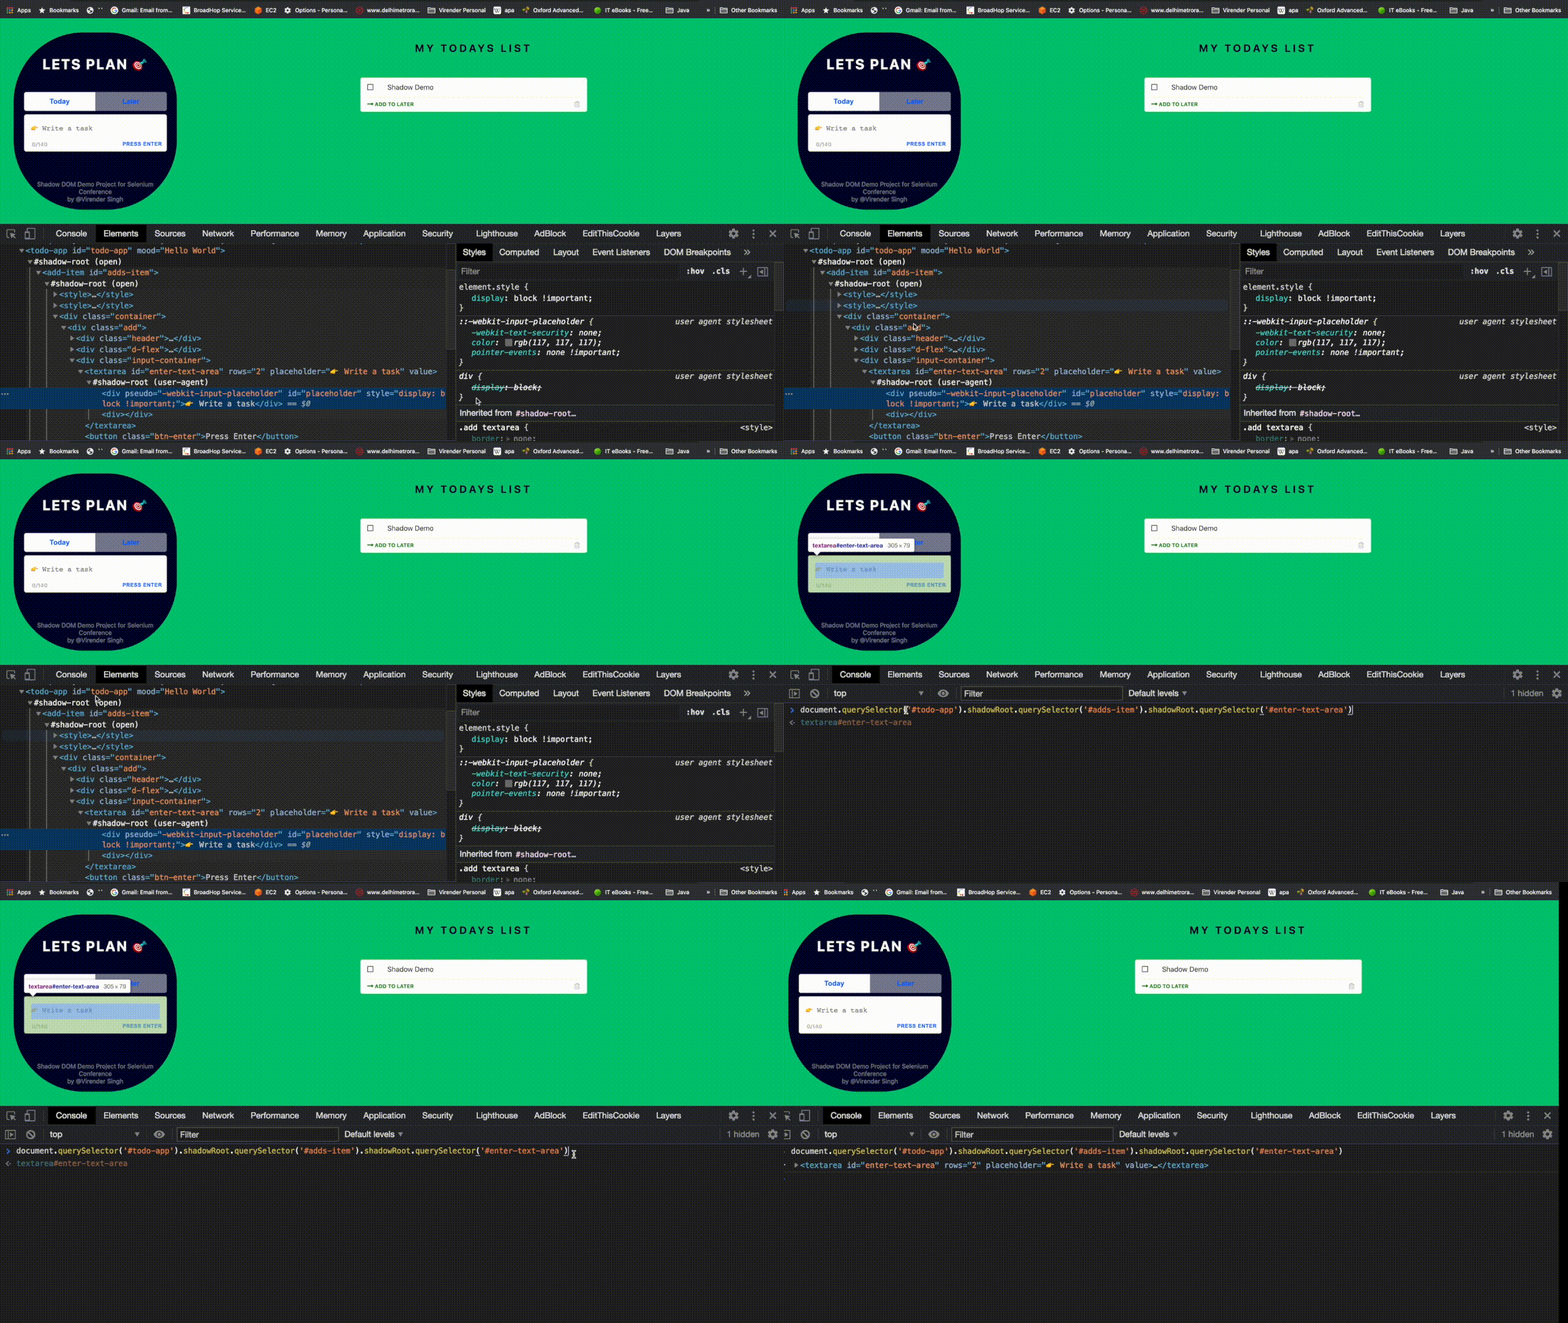
In the above screenshot, we can clearly see: Just to connect to the Shadow Host, first we have used a document interface. After that, we have used the shadowRoot interface back to back and then finally we succeeded to find multi-level elements.
Does W3C Webdriver have any recipe to handle Shadow DOM?
Undoubtedly YES! And we will see the Shadow DOM interaction through scripts as well as under the hood by using HTTP requests.
# Actions Under the hood
Here, we will be needing JavaScript in our JSON payload to access Shadow DOM elements. So lets hit JSON payload over HTTP request to Chrome driver through Postman:
- Start chrome driver at http://127.0.0.1:9515
- Start chrome driver session with below payload at http://127.0.0.1:9515/session
{
“desiredCapabilities”: {
“caps”: {
“nativeEvents”: true,
“browserName”: “chrome”,
“version”: “87.0.4280.141”,
“platform”: “Mac OS X”
              }
       }
}
- Open application URL by using below payload at http://127.0.0.1:9515/session/<sessionID>/url
{
"url":"http://localhost:3000"
}
- Take action on Shadow DOM element by using sessionID and below payload at http://127.0.0.1:9515/session/<sessionID>/execute/sync
{
"Name":"javascript",
"script":"console.log(document.querySelector(\"#todo-app\").shadowRoot.querySelector(\"#adds-item\").shadowRoot.querySelector(\"#enter-text-area\"))",
"Args":[]
}
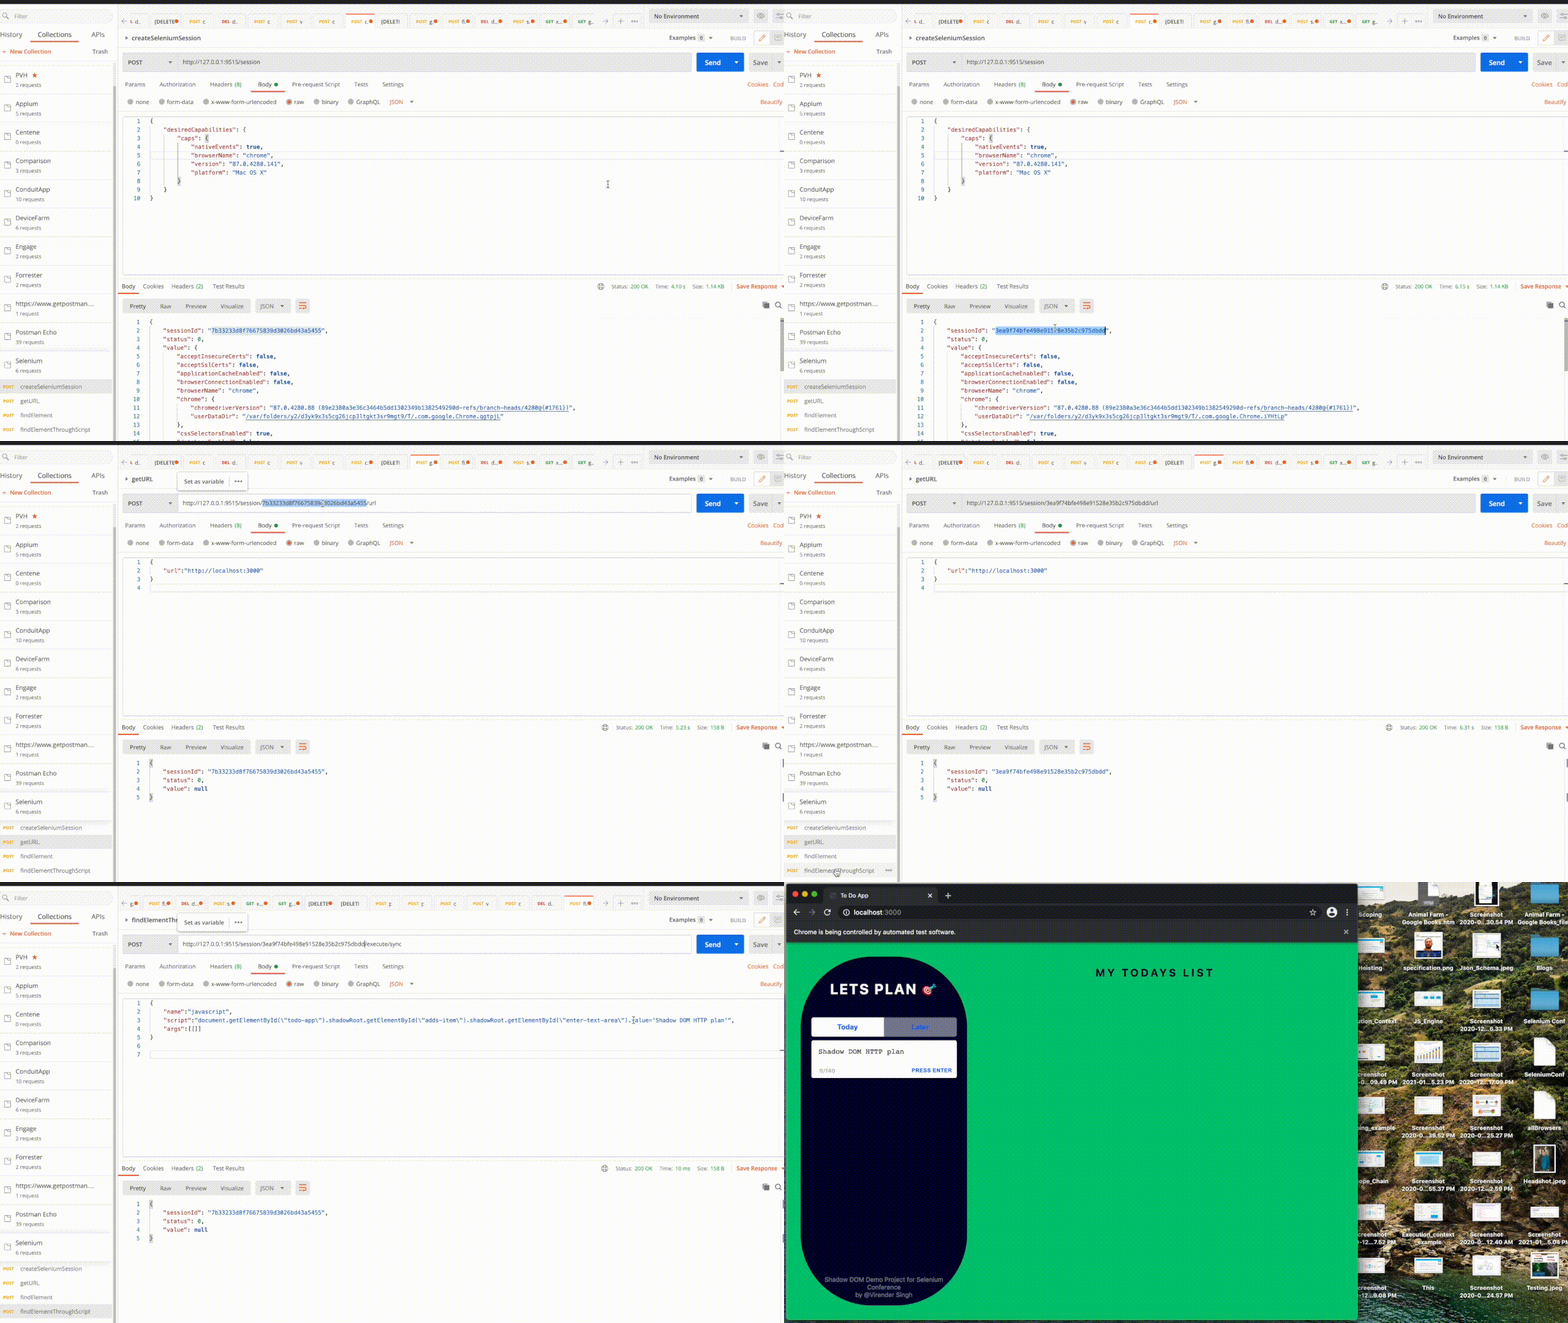
Above we have seen what actually happens under the hood, whenever WebDriver takes the action on any kind of web element.
# Actions Over UI
Here, we will be needing JavaScript in our automation script because JS has complete access to DOM as well as Shadow DOM. JavascriptExecutor interface is going to take actions on “simple javascript elements” as well as “javascript with shadowRoot interface elements” with the help of executeScript method.
// Create a Maven Java project and add the following dependencies
<dependency>
    <groupId>org.seleniumhq.selenium</groupId>
    <artifactId>selenium-java</artifactId>
    <version>4.0.0-alpha-3</version>
   </dependency>   <dependency>
    <groupId>io.github.bonigarcia</groupId>
    <artifactId>webdrivermanager</artifactId>
    <version>3.7.1</version>
   </dependency>   <dependency>
    <groupId>org.testng</groupId>
    <artifactId>testng</artifactId>
    <version>7.1.0</version>
 </dependency>
// Multi level Shadow DOM tree automation code with W3C Webdriver
  @Test
  public void addItemToday() throws InterruptedException {
    WebDriver driver = new ChromeDriver();
    driver.manage().window().maximize();
    driver.get(“http://localhost:3000/");
    WebElement todayShadow = expandRootElement(driver.findElement
    (By.tagName(“todo-app”)));
    WebElement todayAddItem  = expandRootElement(todayShadow.
    findElement(By.tagName(“add-item”)));
    todayAddItem.findElement(By.tagName(“textarea”)).sendKeys
    (“Selenium Conf India @2020”);
    todayAddItem.findElement(By.tagName(“textarea”)).sendKeys
    (Keys.ENTER);
    todayAddItem.findElement(By.tagName(“textarea”)).clear();
    todayAddItem.findElement(By.tagName(“textarea”)).sendKeys
    (“Selenium Conf India @Bengaluru”);
    todayAddItem.findElement(By.tagName(“textarea”)).sendKeys
    (Keys.ENTER);
  }

public WebElement expandRootElement(WebElement element) {
  WebElement ele = (WebElement) ((JavascriptExecutor) driver)
  .executeScript(“return arguments[0].shadowRoot”,element);
  return ele;
  }
}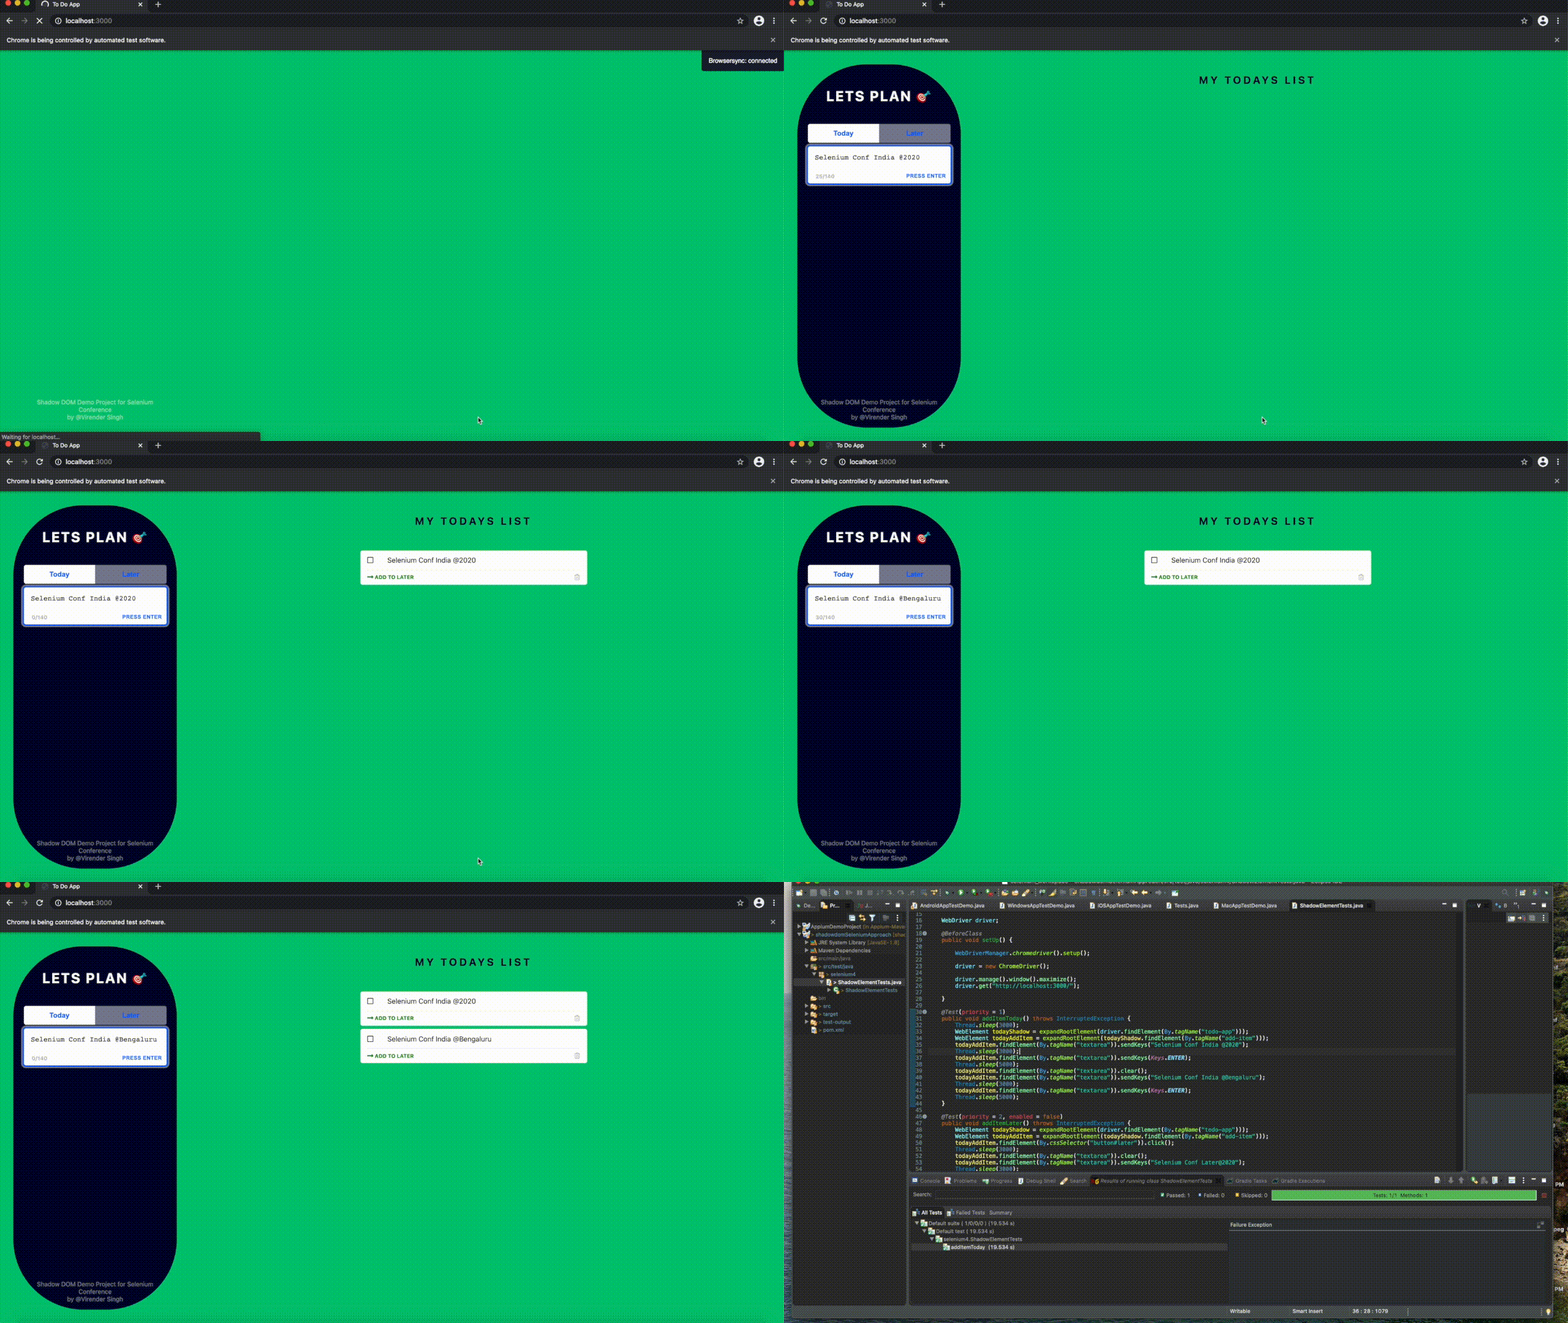
The above code snippet only contains ChromeDriver, but it supports all W3C web drivers — FirefoxDriver, EdgeDriver, and SafariDriver. Let’s get your hands dirty with other browsers ✌️✌️
// FirefoxDriver
FirefoxDriver driver = new FirefoxDriver(“YourTokenNumber”, new FirefoxOptions());
// EdgeDriver
EdgeDriver driver = new EdgeDriver(“YourTokenNumber”, new EdgeOptions());
// SafariDriver
SafariDriver driver = new EdgeDriver(“YourTokenNumber”, new SafariOptions());
📍📍 The application that we have taken above for the automation, can be found at my — GitHub repo. This application is implemented by using Google’s Polymer library with NodeJS. So install that first pre-running this application locally.
📍📍Good News — Very soon, the W3C Webdriver community will roll out the native support of Shadow DOM. Mr. Jim Evans has published this news on his Twitter handle.
📍📍One Common Exception — As we know, WebDriver does not track the active, real-time state of the DOM/ShadowDOM. So while taking actions on refreshed Shadow DOM elements through W3C Webdriver, sometimes we face StaleElementReferenceException. This means that the shadow DOM elements are treated as stale and inaccessible to Webdriver with an old reference ID. For more nitty-gritty of StaleElementReference exception, please click here — Anatomy of StaleElementReference exception.
Key Takeaways
- Did grasp automation handling of custom elements WITH / WITHOUT attaching Shadow DOM
- Understood the importance of OPEN/CLOSED mode of Shadow Root
- Better known with the constraints of legacy selectors {Xpath, CSS} with Shadow DOM elements interaction
- Got to know about User-Agent Shadow DOM
- Cracked the jinx — interaction with multi-level Shadow Root elements
- Workaround — With one team effort, we can also automate CLOSED mode scenarios
- Understood — Under the hood webdriver interacts with Shadow DOM elements
- Clear thought — How W3C webdriver supports Shadow DOM elements
Now we have a crystal clear picture of the Shadow DOM tree and its interaction with the W3C Webdriver. But still, we have curiosity:
- Are there any open-source tools in the market that support Shadow DOM elements natively?
- For Shadow DOM, Which tools we need to choose if we are starting automation from scratch?
- What if we append Shadow DOM to an element, which resides in iFrame?
We are about to win the battle so let’s move to Chapter 3 {Native Automation support for Shadow DOM — with WebDriverIO and Cypress}, which is already rolled out to clear all above open questions!! Keep winning, Keep learning, and spread automation 👍👍👍👍


